SIM4ME Portal consists of two parts. They are:
SIM4ME Portal Document Actions Pane
Excel Workbook
The components of SIM4ME Portal Pane are summarized below:
|
Feature |
Description |
|
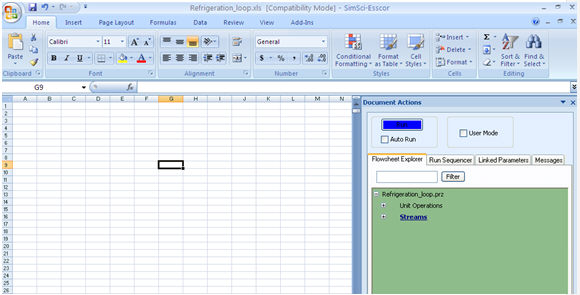
Flowsheet Explorer |
The Flowsheet Explorer displays a tree view of the unit operations and streams available in the flowsheet. The unit operations and streams are grouped under their respective classes. Each class has a hierarchical structure of entries. Each unit operation or stream is associated with a parameter group, which may have one or more parameters associated with the group. The Flowsheet Explorer is a floating window, which can be resized and moved to any preferred location. |
|
Run Sequencer |
Run Sequencer tab allows the user to define the order of simulation in which the user wants to execute them. When a simulation is disconnected, the sequence will be automatically updated. It contains a list box to define the sequence of simulation files. |
|
Linked Parameters Tab |
If a large number of parameters from the flowsheet explorer are dragged and dropped onto the worksheet, it can become difficult to quickly locate the parameters in the Excel sheet. The Linked Parameters tab displays the live linked parameters. Double-click on any parameter. It will point to the parameter’s location in the Excel sheet. |
|
Messages Tab |
The Messages Tab displays any pre-processing warnings/errors generated by PRO/II. |
|
Run Auto Run |
The Run button executes the prz file from Excel sheet. The "Auto-Run" option causes the prz to run continuously whenever any change is made in the Excel workbook. |
|
User Mode |
The developer can look at the Portal file from "User Mode" if the check box is clicked. In User Mode, the FS explorer becomes inactive and new drag-drop to the spreadsheet is prevented. |
|
Filter |
The Filter button filters the parameters based on the string you supply. Note that it does not filter at a group level or at a Unitop level. In the current implementation, it only filters at the attribute level. Example: Enter "Temp" as the string. It gives all instances of Temp in the Flowsheet Explorer. |
The input values and output/calculated values of the all the parameters can be identified with an icon in front of the parameter.
Input values for all the Unit Op and Stream parameters will appear with a BLUE icon for identification.
![]()
Calculated values for all the Unit Op and Stream parameters will appear with a GREEN icon for identification.

When the input parameters which are drag-dropped on to the excel sheet are modified, the modified values are shown in RED.
After hitting the run button, if the PRO/II simulation file converges (Run completes successfully), the run button is shown in BLUE with the modified input parameters returning to BLUE color.
After hitting the run button, if the PRO/II simulation file does not converge (Run fails), the run button is shown in RED with modified input parameters still in RED color.
When you do a "Restore Input Data", the run button is shown in PINK.
The current UOM Slate is the current slate in PRO/II flowsheet. You cannot over-ride the slate in the current phase. You can change the UOM of individual scalar attributes or full vectors by clicking the UOM cell on the worksheet and choose the option to "Change Units" or "Convert Value".

Note: "Change Units" leaves the associated value unchanged when units are changed. "Convert Value" converts the value along with the associated units of measure.
The Workbook consists of the "Solution History" worksheet and other worksheets. Variables can be dragged and dropped from the Flowsheet Explorer onto any worksheet except the "Solution History" worksheet since the SIM4ME Portal program generates it. Input values can be changed in the worksheets and to run the simulation, "Run" button in the Flowsheet Explorer should be clicked.
It is possible to provide "custom descriptions" to variables as desired. For example, you may want to rename "F1 Temperature(User Input)" as "Flash Temp".
When a worksheet has many cells containing variables linked to PRO/II and cells containing description modified by the user, it can become very difficult to identify the variable, which was originally contained in the cell.
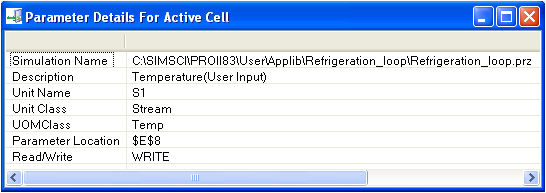
Right-click on the cells and select "SIM4ME--View parameter details" to view the details of the actual link to PRO/II.
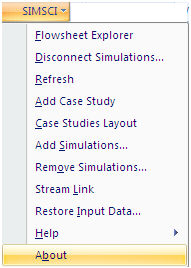
The SIM4ME Portal menu has an additional drop-down menu, SIMSCI. The SIMSCI menu in the Portal has options to disconnect the SIM4ME Portal from Simulation, Refresh, Add and Remove Simulation, Add Case Study, Stream Link, Case Studies Layout, and Restore Input Data.
|
Flowsheet Explorer |
Once the Flowsheet Explorer is closed, it can be invoked from this option.
|
|
Disconnect Simulations |
Disconnects Simulations from the workbook. |
|
Refresh |
After creating a workbook, it is possible that the user modifies (from PRO/II) a PRO/II simulation file such as renaming a Unitop/stream, deleting a Unitop/stream, or modifying an input value. The "Refresh" option will update the Excel sheet cells in the Portal with the current values of the PRO/II simulation file (prz).
|
|
Add Case Study |
This option allows the user to add a case study example. |
|
Case Studies Layout |
This option toggles the format of case study grid arrangement from Horizontal to Vertical cycles and vice-versa. |
|
Add Simulations |
This option is used to add a simulation to the portal file. |
|
Remove Simulations |
To remove the simulation from the portal file. |
|
Stream Link |
Stream Link option provides an ability to link vectors like composition from one simulation to another. |
|
Restore Input Data |
This is useful to invoke the "Restore Input Data" command in PRO/II from SIM4ME Portal itself. |
Case Study
This feature allows the user to add a Case Study Example. The following steps are followed to add a Case Study and work on it.
Click on a particular cell in the worksheet and then click on SIMSCI --> Add Case Study option to create a case study example.
An empty Case Study grid is created at the selected cell location on the worksheet with
Run button inactive.
Delete button active - selecting delete option removes the case study grid completely

Drag-drop the parameters on the worksheet cell indicating "Add Param+". The input parameters are indicated with Blue flag and calculated parameters are indicated with Green flag on Flow sheet explorer.
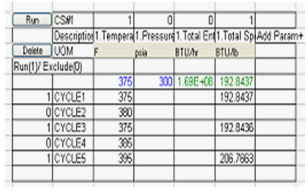
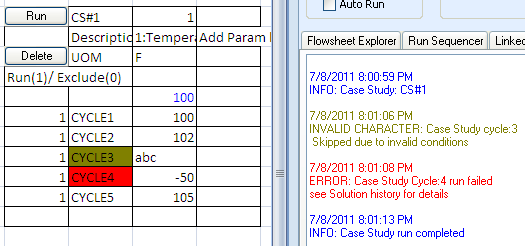
The parameters after being dropped on the case study grid take the appropriate format as shown below in the snapshot. The Run button gets activated.
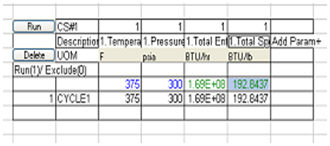
Provide the case study iterations by entering random value under input parameter (Blue) column in case study grid.
As soon as random value is entered in the cell under input parameter column, case study grid expands and denotes this entered value as CYCLE2. This is iteration 2 of the case study run.
Right-click on cell under input parameter column in case study grid to find the "SIM4ME - Generate Points" context menu.
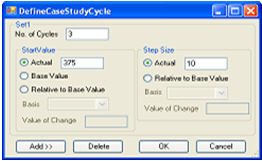
Click on SIM4ME - Generate Points option to define the case study cycles.
"Define Case Study Cycles" dialog box appears using which three different sets of data can be defined for the case study cycles. As shown in this example, one set of three cycles is defined starting with 375 and step size of 10.
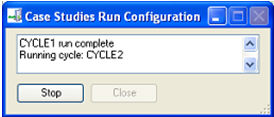
Click the Run button of the Case Study grid.
The Case studies Run Configuration window pops up giving details about the iterations under execution. The calculated parameters get updated simultaneously for respective changes in the input parameters.
Change the "Include/Exclude" Flags from 1 to 0 for columns to exclude a particular parameter from case study run. Similarly, change the "Run/Exclude" flags from 1 to 0 for rows to exclude a particular cycle from case study run.
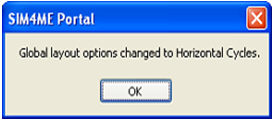
Click SIMSCI --> Case Studies Layout.
This option toggles the format of case study grid arrangement from Horizontal to Vertical Cycles and vice-versa. After this, the cycles shown in columns and parameters are shown in rows for new case study grid. The rest of the functionalities are same as described above.
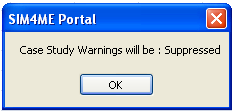
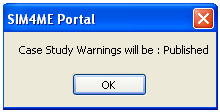
Click SIMSCI --> Suppress Case Studies Warnings. This option toggles the display of Case Study Warnings; Suppress to Publish and vice-versa.
The Case study feature also gives an option to continue the case study iterations even if some preceding iterations fail during Case Study RUN. The relevant messages are displayed in the Messages tab of the action pane.
Multi Simulation Link
This feature is used to add a simulation to the portal file. The following steps describe about the feature and to add a simulation:
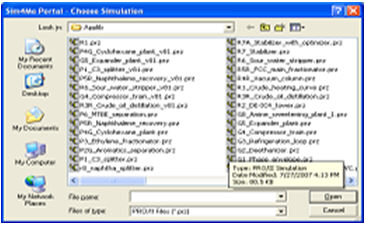
Sim4Me Portal for R1.prz is launched as a starting condition. Click SIMSCI --> Add Simulations.
Sim4Me Portal - Choose Simulation dialog box will pop up. Select a single simulation by clicking on it or multiple simulations using Ctrl key and then click Open button.
When new simulations are added to the portal file, The following changes are seen in the portal file:
New simulations get added to Flowsheet Explorer in the tree node
The newly added simulations get added in the Simulations Added box of the Run Sequencer Tab
The mouse hover tool tip when pointed on the name of the simulation in Flowsheet Explorer tab, it shows complete path of the simulation.
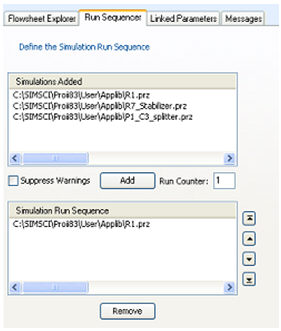
The Run Sequencer Tab has following components:
Simulations Added Box: The added simulations are shown in this box.
Simulation Run Sequencer Box: The simulations to be executed using "Run" button are shown here.
Suppress Warning Checkbox: Warnings during running the simulation are suppressed when this check box is selected.
Run Counter field: The defined run sequence completes number of iterations mentioned in this field.
Add Button: Highlighting the simulation from Simulations Added box and clicking on "Add" button copies the simulation to the Run Sequence.
Remove Button: Highlighting the simulation from Simulation Run Sequence and using "Remove" button removes it from the run sequence.
Move to Top, Move Up, Move Down and Move to Bottom Arrows: These arrows are used to re-define the order of run sequence.
The Run Sequencer Tab has the design as shown in the snapshot below:
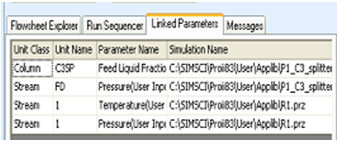
Drag-drop few parameters from different simulations on the worksheet. The Linked Parameter tab has following components:
a. Unit Class: The Unit class of the parameter dropped on the worksheet is displayed under this column.
b. Unit Name: The Unit Name of the parameter dropped on the worksheet is displayed under this column.
c. Parameter Name: The name of the parameter dropped on the worksheet is displayed under this column.
d. Simulation Name: The complete path of the simulation that the parameter, when dropped on the worksheet, belongs to is displayed under this column is displayed under this column.
The design of the Linked parameter tab is as expected. When double-clicked on any of the rows, it points to the respective parameter reference on the worksheet.
Run the simulation after defining the run sequence using Run Sequencer tab. Then the following process take place:
a. The simulation under run Sequence that is being executed is captured in status bar as shown in snapshot below.
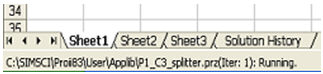
b. The solution history worksheet gets updated in the same order as defined in run sequence.
c. Messages that appear during Run are captured in Messages tab.
d. If any of the files is not converged, "Do you want to continue?" message pops up. Selecting "Yes" would continue to the next simulation in run sequence and selecting "No" will stop the Run completely.
e. The files which converge are indicated in Blue color on Run Sequence Section while the ones failed are shown in Red color.
Click on the Remove Simulations option under SIMSCI menu. The following process takes place:
a. Option to select the simulations to be removed pops up as shown in the snapshot below.
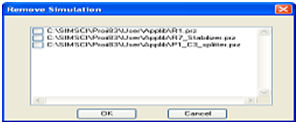
b. After clicking on OK button, the Flowsheet explorer tree node corresponding to that particular simulation vanishes.
c. If there are any parameters on the worksheet corresponding to the simulations removed, they get grayed out until they are added back.
d. The names of the simulations removed get removed from the run sequencer tab and linked parameter tab.
e. If the simulations are added back to the portal file using "Add simulations", they appear only in the Simulations added section of the run sequencer tab.
Assay Handling
This feature describes about the Assay Handling and Assay Characterization.
Sim4Me Portal for R1.prz is launched as a starting condition. Stream 1 in this simulation is an Assay Stream. Expand the Flowsheet Explorer and go to Stream 1 expansion to see that Assay Characterization Options is added as last group.
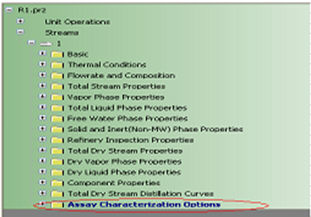
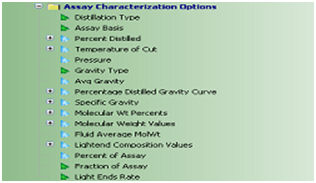
Expand Assay Characterization Options to see access to following Assay Distillation Profile Inputs:
a. Distillation Type [Read]
b. Assay Basis [Read] (Liquid volume / Weight)
c. Gravity Data [Write]
d. Vector of Percent distilled vs gravity [Write]
e. Average Value for Gravity [Write]
f. Distillation Pressure [Write]
g. Vector for Percent Distill Vs Temp [Write]
h. Molecular Weight [Write]
i. Lightends Data [Write]
Drag-drop "Percent Distilled" vector on the worksheet and change the value(s). Similarly any writeable attribute can be dropped on the worksheet and change its value(s) before clicking on Run simulation button on the portal worksheet.
"Pseudocomponent Deletion" message pops up indicating that new set of pseudocomponents would be generated. When Run button is clicked, simulation is executed with the updated values provided.
Miscellaneous Features
Stream Link Feature: This feature can be accessed by clicking on a particular cell in the worksheet and clicking on SIMSCI --> Stream Link option to link a vector like stream composition vector from one simulation to another. As part of the ability to handle multiple simulations, linked simulations have the ability to link an output vector from a simulation earlier in the sequence to an input vector in a simulation later in the sequence.
When two vectors like composition vectors from different simulations are connected, the composition of components gets connected via Excel sheet formulas which are left for users to connect as per their choice.
Whenever user runs the early simulation the associated stream composition data gets automatically passed to the later simulations by using the provided Excel sheet formulas.
This linking is useful mostly in cases where large number of elements is present in the stream vector.
For large vectors, if the linking is performed outside the Stream Link grid, the performance of the application slows down. To help users connect the large vectors efficiently, Stream Link feature is quite useful.
As shown in the snapshot below, the output Vector needs to be dropped into the second column of the stream link grid whereas input vector needs to be dropped into the fourth column. The Excel sheet formula linking can be done as per user’s choice. By default, there is no formula link between the two vectors.
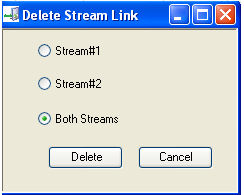
Clicking on the ”DelSL#1” button, user will get options to select either one of the vectors or both the vectors. Selecting the ”Both Streams” option will clear the stream link grid from the worksheet.

Macro Support: Sim4Me Portal 2.1.1 provides macro support which enables click on Run button. Any portal 2.1.1 file when prepared consists of a pre-defined macro "SIM4MEPortalRunMacro”. Users can call this macro in their pre-defined macro, which enables the click on Run button of the Document Action. When the Run button is clicked using macro, the run sequence under Run Sequencer tab gets executed. A12345 cell in active worksheet is used to convey user regarding run status. When SIM4MEPortalRunMacro is running, this cell would be having ”-1”. When Run successfully completes, it would show ”1” and when Run fails, it would show ”0”. Once Run completes, status would remain persistent till user runs his macro again.
Ability to select Individual vector elements: Portal 2.1.1 allows the selections of individual elements of a vector such as individual components in a stream, rather than all components of the stream.
Make Run button always visible: Portal 2.1.1 keeps RUN button static so that it is always visible, no matter how much the variable tree is expanded.
Ensure Forward Compatibility of Portal files: Portal 2.1.1 supports forward migration of all Portal files. Any portal file, which is prepared using versions prior to Portal 2.1.1, gets automatically upgraded when tried to open in Portal 2.1.1. A backup of the original portal file is kept as _v10.xls at the same location that could be opened in the previous version of Sim4Me Portal.
![]()
Related Topics