Access
Use the Export command on the Express menu, or use the keyboard shortcut Alt +FI, E to open this dialog window.
Description
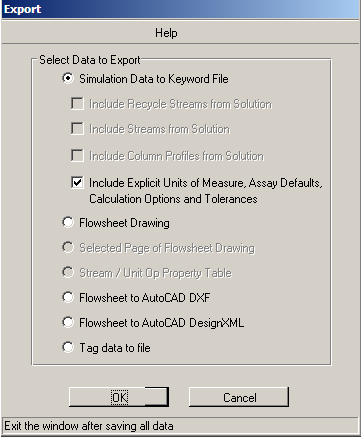
When the Export dialog window opens, it presents a list of operations that it can perform. You must choose one of them and press the OK button to continue. Behavior varies at this point, depending upon the selection you have made.
![]() Simulation
Data to Keyword File
Simulation
Data to Keyword File
This selection opens a special Save As dialog window that allows you to export the input data of the simulation to an ".inp" keyword input file. Navigate to the destination drive and directory of your choice using the Save In: field. Enter the name of the output file in the File Name: field. Press the Save button to complete the operation.
The exported keyword file then may be imported into any compatible version of the PRO/II program to re-run the simulation, even on another computer. Keyword files also are a very compact way to archive the data. Note that the keyword file contains all the appropriate data sections (General, Thermodynamics, etc.).
In v6.0, the "Simulation Data to Keyword File" option is expanded to include check boxes to control exporting stream and column solution data to the keyword file.
If output data exists, even if the solution is unconverged, then the two "Include" check boxes are enabled. If the Run command has not been executed since creation or since the last time "Restore Input Data" has been executed, then these checkboxes are disabled.
Select the "Include Explicit Units of Measure, Assay Defaults, Calculation Options and Tolerances" check box to explicitly print all the attributes including defaults on the DIMENSION, OUTDIMENSION, ASSAY, CALCULATION, and TOLERANCE statements to the keyword file. This verbose option is selected by default. Clearing the check box will minimize the content on the keyword file. Regardless of selection, the resulting keyword file will generate precisely the same simulation.
The last used export option will govern how the keyword reprint appears on the output report (.out file).
Note: If there are no petro components or assay streams or PRINT TBP in the simulation, and the user has not overwritten any globally installed assay default, the ASSAY statement will be suppressed even if this option is selected.
![]() Flowsheet Drawing
Flowsheet Drawing
Selecting this option immediately copies the entire PFD to the clipboard. From there the drawing may be pasted into any OLE-enabled application. This function is automatic, and the Export Flowsheet Drawing message box appears to inform you of the status. Press the OK button to complete the action and return to the PFD Main window.
![]() Selected
Page of Flowsheet Drawing
Selected
Page of Flowsheet Drawing
It may be inconvenient to export the complete drawing of a large flowsheet. First use the Draw menu Page command to divide the drawing into pages. Use the mouse to highlight one page and select this command. Copy the page to the clipboard by pressing the OK button. A message box appears and reports the status.
![]() Stream/
Unit Operation Property
Table
Stream/
Unit Operation Property
Table
Export a stream property table or a unit operation property table to an external text-based file. Use the mouse to highlight a stream property table on the flowsheet drawing. Select this command and press the OK button to open the Export File Filter dialog. Use the Save In: list box to navigate to a destination directory. Enter a name for the file in the File Name: field. Press the Save button to complete the export.
![]() Flowsheet to AutoCAD DXF
Flowsheet to AutoCAD DXF
This selection opens a special Save As dialog window that exports the PFD Drawing of the simulation to a ".DXF" AutoCAD file. Navigate to the destination drive and directory of your choice using the Save In: field. Enter the name of the output file in the File Name: field. Press the Save button to complete the operation.
![]() Flowsheet to AutoCAD DesignXML
Flowsheet to AutoCAD DesignXML
This selection opens a special Save As dialog window that exports the PFD Drawing of the simulation to an ".xml" AutoCAD file. Navigate to the destination drive and directory of your choice using the Save In: field. Enter the name of the output file in the File Name: field. Press the Save button to complete the operation.
![]() Tag data to file
Tag data to file
This selection opens a special Save As dialog window that exports all the Tag data in the simulation to a ".RAW" tag-data file. Navigate to the destination drive and directory of your choice using the Save In: field. Enter the name of the output file in the File Name: field. Press the Save button to complete the operation.
Exporting Plot Data
You can also export plot data to other spreadsheet applications. You can do this from the Plot window by selecting the Output\Generate Plot command. From that window, open the desired plot and select the File\ Export command. See Plot Overview for more details.
![]()
Related Topics